You can create products for competitors to purchase either for an event or in your shop.
To find the Product settings, click Account in the Settings menu on the left.

Then from the Account settings page, click the Products heading at the top. If you have created any products they will be shown here. To edit an existing product click on its name or create a new one by clicking New Product.


There are two types of product you can sell:
- Generic
These can be shown in your shop. - Tyres
Tyres will not be shown in the shop, only when entering events.
Give your product a name which will be displayed to customers. If the name of your product is particularly long you can give it a shorter name that will automatically be truncated to by the system if necessary.
Give your product a stock code - this won't be shown to the end user but will help you identify a product in a report.
.
You can then add a short description of your product which will be shown under the name of the product to customers.
You can assign your products to a group. This will group products with the same number together in the shop.
To show the product online tick the “Active” tick box; untick the box to hide it. (If an item is sold out this is controlled below).
If you want a generic item to be available to all customers regardless of championship class or type then tick the “Available in public facing shop” box. Tyres should not appear in the shop.
You can then choose which bank account you would like payments to be sent to (if applicable) using the dropdown.
You can set the VAT of your product here and if you want a specific code to appear on your financial reports you can also add that here.
Product Photo
You will then need to upload a picture of your product. This should be approximately square and at least 360 x 360 pixels.
The image will automatically be scaled to fit a 360 x 360 px frame.
If you need to remove or change the picture you can click the corresponding buttons under the image.

Pricing
If you need to make a product unavailable to purchase you can untick the “Available for purchase?” box. This will still show the product in the shop but will not allow it to be purchased.
Put the price of the product in here excluding any VAT. The VAT should be set when you choose the bank account the money is paid to. The VAT amount and price including VAT will be shown below.
You can also set a minimum and maximum quantity a customer can purchase.
You can also make the purchase (and quantity) mandatory by entering an amount here. If set, then the system will automatically add the product(s) to the order (this only applies to Race Day events). A Competitor will not be able to remove these products from their Entry Order but can change the quantity within the Min-Max range.
If these are items to be hired, rather than purchased you can tick the “Available for hire” box. This will be per event.
Click the Update/Create button to save your Product.
Allocating to Classes
Once the product is created you can map each product to a specific class. This will stop a competitor purchasing the wrong product i.e. the wrong tyres for their class. Click the choose classes button to show a list of classes to choose from.

Tick the respective classes and then click Update Product Classes to save the selection. These classes will then be shown under the Choose classes button.

Adding Products to an Event
The final step is to allocate the products to an event. Click the Manage events button to show a list of events to choose from.
Tick the Events you would like to have the products available at. Each product can have a default minimum and maximum quantity that a customer can purchase. This can be adjusted in the event, if the event has specific requirements (see Event Product settings.)
You can also set the default purchase quantity mandatory by entering an amount in the third column (leave as 0 to not make it Mandatory). If set, then the system will automatically add the product(s) to the order. A Competitor will not be able to remove these products from their Entry Order but can change the quantity within the Min-Max range.
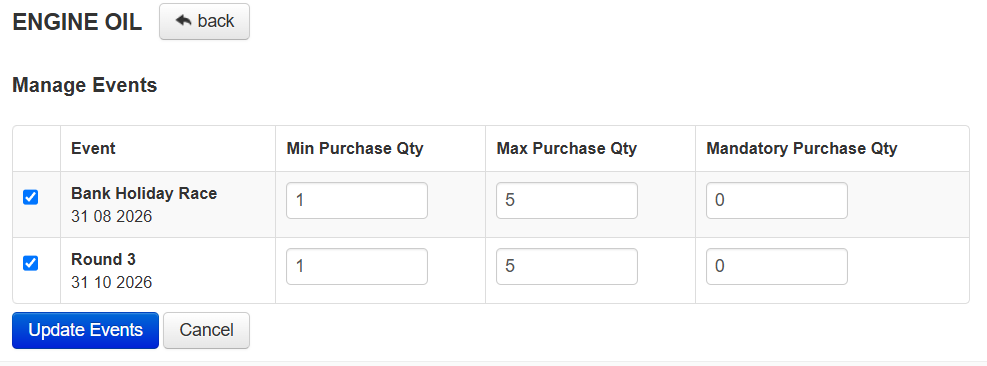
Click Update Events to save your changes.
Was this article helpful?
That’s Great!
Thank you for your feedback
Sorry! We couldn't be helpful
Thank you for your feedback
Feedback sent
We appreciate your effort and will try to fix the article